![]() We posted back in September that Word 2016 was finally available for Mac Users. It’s also available for PC users now. We’ve had some time to use this new version and found that it makes using Styles significantly easier with a few simple changes.
We posted back in September that Word 2016 was finally available for Mac Users. It’s also available for PC users now. We’ve had some time to use this new version and found that it makes using Styles significantly easier with a few simple changes.
Why do styles matter?
- Easier, accurate formatting
- Bulk changes for formatting
- Quickly review & restructure
- Built in Table of Contents options
Word 2016 Styles Pane
Most of the improved style tools are in the Styles Pane accessible from the Home menu:
This tool gives you a quick way to preview the styles available, whether or not they appear in your home ribbon, and it stays open as you navigate the rest of your editing tools.
Top Section: Current Style
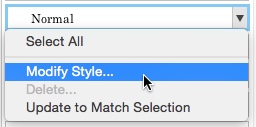
This top section makes it easy to bulk select text, create new custom styles, or modify the ones you’ve used (or want to use) in your document. See the drop-down arrow for all of these options:

Center Section: “Apply a Style” List
If your list doesn’t include the styles you want to use, check the “List:” drop down at the bottom to switch between “Recommended,” “Styles in Use,” “In Current Document,” and “All Styles.”
Bottom Section: Styles Guides
Documents that have been edited by multiple users may have a lot more built into the document. If you want to preview where these are applied, the “Show style guides” checkbox at the bottom will turn on the rainbow markings in the example above.
“Show direct formatting guides” will put highlighted boxes around the blocks of inline text that have special formatting.
Customizing Styles
(Note: Even if you’re using an older version of Word, these tips will still apply, though the view may be different)
1. Start with your Normal style if you want to change the default font or line spacing.
2. Use the “Modify” command to access more options – in the drop down from the style pane or by using “right click”:
3. To get to options like more precise line spacing or outline level (for Table of Contents customizations), check the Format drop down to go to Paragraph Settings:
Compliance Concerns
Court rules dictate formatting very precisely for briefs and other legal documents. If you review these, you can build them into your default styles and be sure each edit you make will be accurate without fiddling with formatting.
Example Court Rule
IL Supreme Court Rule 341 (Amended December 9, 2015, eff. January 1, 2016)
The text must be double-spaced; however, headings may be single-spaced. Margins must be at least 1½ inch on the left side and 1 inch on the other three sides. Briefs shall be safely and securely bound on the left side in a manner that does not obscure the text. Quotations of two or more lines in length may be single-spaced; however, lengthy quotations are not favored and should be included only where they will aid the court’s comprehension of the argument. Footnotes are discouraged but, if used, may be single-spaced. Rule 344(b) prescribes 10-point type on 11-point slugs, instead of the 11-point type used in the body.
What to check:
- Normal: is it exactly double-spaced? What is the font size for the ‘body text’?
- Headings: Are they single-spaced?
- Footnotes: make sure it uses a different style than Normal so you can change the spacing and font size.
Don’t have Word 2016 yet?
Chicago-Kent students (or staff & faculty) can request this upgrade through the ITS help desk or install it on home devices through this page using your kentlaw login: http://mso.kentlaw.iit.edu/. One reason to have ITS help you: you may otherwise end up with two versions of Word on your computer.
Quick Guide for Word 2016:
An overview of new features from Microsoft:
Further Examples:
- Word for Law School – our library guide created for Chicago-Kent students and kept up to date for lectures and workshops.
- How to Format an Appellate Brief


